This guide takes you through the process of constructing a stage using 12 pallets. Let’s begin!
Materials Needed:
- 12 wooden pallets
- Plywood sheets (for the stage surface)
- Saw (circular saw or hand saw)
- Measuring tape
- Pencil or marker
- Hammer
- Nails
- Screws
- Screwdriver or drill
- Wood brackets (optional, for added stability)
Step 1: Set Up Your Work Area<br>
Choose a spacious, level area for your project. Lay down a tarp or sheet to catch debris. Organize your tools and materials.
Step 2: Preparing the Pallet Base
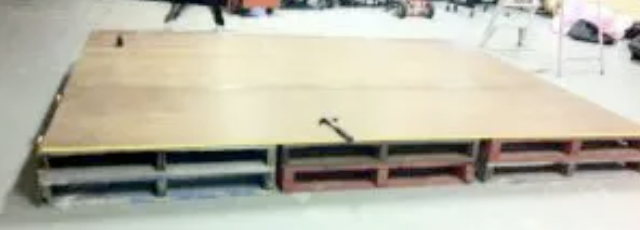
1. Form a 3×4 grid by arranging the 12 pallets on the ground. Ensure alignment and levelness for stability.
2. If desired, strengthen corners where pallets meet with wood brackets for additional support.
Step 3: Crafting the Stage Surface
1. Measure the dimensions of the pallet grid and cut plywood sheets to match. These sheets will serve as the stage’s surface.
2. Position the plywood sheets on the pallet grid for a snug fit.
Step 4: Securing the Stage Surface
1. Attach the plywood sheets securely to the pallets underneath using screws. Place screws along edges and centers of sheets for even support.
Step 5: Finish Your Pallet Stage
Your completed Do-It-Yourself pallet stage is now ready for various events and performances. For stability, position the stage against a wall or sturdy surface. Your stage offers a blend of functionality and rustic charm, making it a versatile addition to your hosting needs.