Whether your goal is to provide shade for café visitors or to create a comfortable shelter from the elements, this guide will walk you through the step-by-step process of building a sturdy seating area cover that seamlessly combines functionality with visual appeal.
Materials Needed:
Timber SAP H2 – CCA Treated (38 x 38 x 3.6m) Poles
Nails (recommended sizes: 2-inch and 3-inch)
Measuring tape
Spirit level
Hammer
Saw (for cutting wood, if necessary)
Chalk or stakes (for marking positions)
Mallet or hammer (for compacting soil)
Sandpaper (for finishing)
Steps:
1. Preparation:
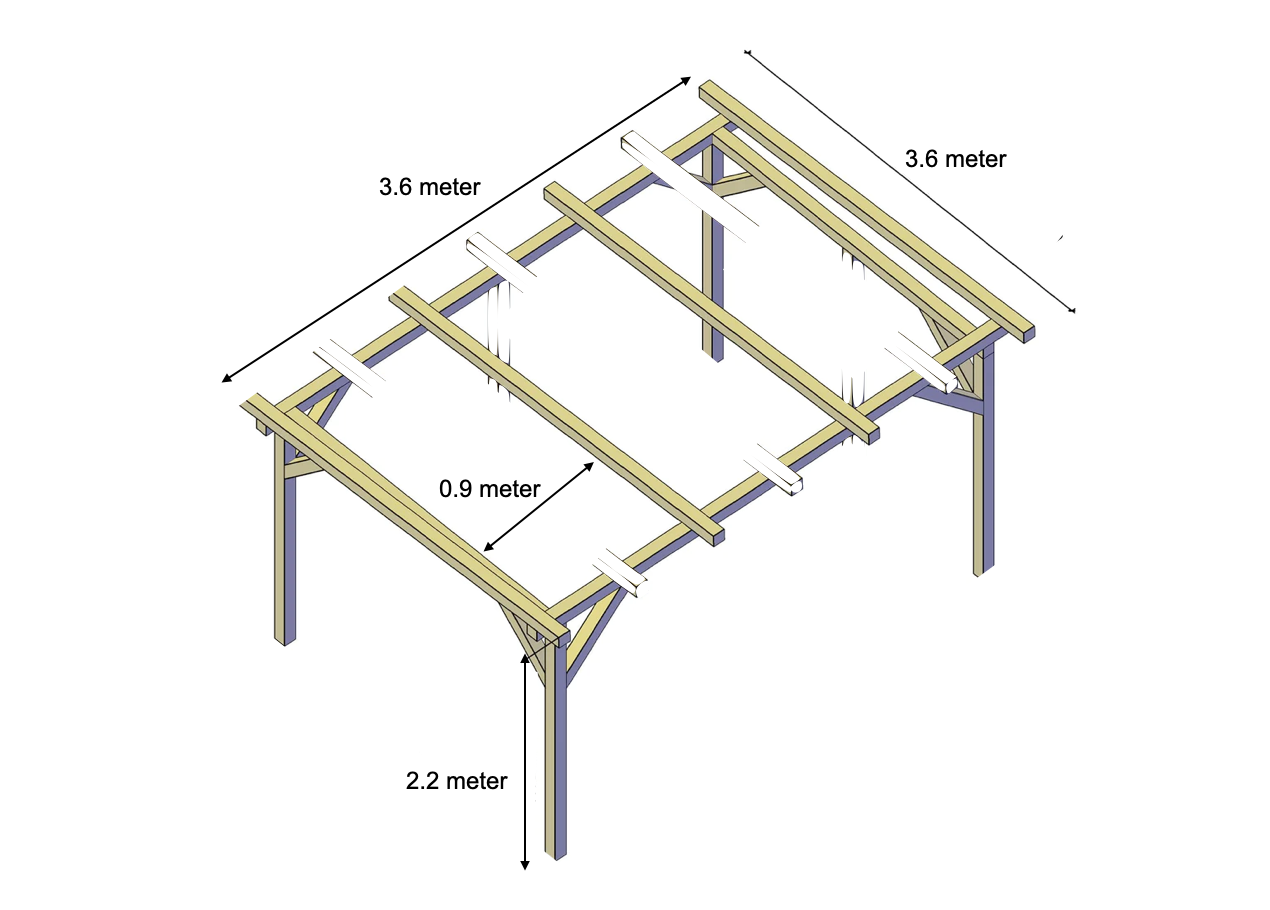
Begin by measuring the desired coverage area. In this case, you’ll be constructing a square seating cover to fit a 3.6 x 3.6-meter area.
2. Marking the Locations:
Accurately measure and mark the positions for all four corners of the seating area cover. Utilize stakes or chalk to clearly indicate these spots on the ground.
3. Install Support Poles and Backfill Holes:
Commence by excavating holes at each of the marked corners. Make these holes around 60cm deep to accommodate the full length of the 220cm pole (360cm – 140cm cut off) leg poles.
Cut off 140cm from the 4 pole that will be used for the legs. These leg poles will go into ground & be become the legs poles to hold up the top. Ensure they are placed in a straight and level manner using a spirit level to verify alignment.
Immediately backfill the holes with soil, compacting the soil around the leg poles to provide a sturdy foundation for the structure. Use a mallet or hammer to gently tamp down the soil.
4. Creating Square Frame:
Attach the top frame poles securely to the tops of the leg poles on opposite sides, creating a square frame on top.
5. Attaching Corner Braces Between Square Frame and Legs:
To enhance stability, add corner braces between the top square frame and all four corner legs. Cut 8 wooden pieces, each 60cm long, at a 45-degree angle (using the Grip Backsaw and Plastic Mitre Box). Attach them securely between the top of each leg and the top of the adjacent square frame. This additional bracing will provide structural support and contribute to the overall stability of the seating area cover.
6. Finishing:
Before proceeding further, ensure that the frame is level and exhibits stability. Make any necessary adjustments at this stage.
7. Safety Check:
Thoroughly inspect the structure to confirm that all nails are securely fastened. This step is essential to ensure the overall safety and stability of the seating area cover.
8. Final Touches:
To enhance user comfort and safety, sand down any rough edges present in the wood. This step can prevent splinters and make the structure more user-friendly.
9. Clean Up:
Conclude the construction process by tidying up the work area. Remove any debris or leftover materials, leaving behind a clean and organized space.